RV INVERTER INSTALLTION INSTRUCTIONS
Here is the RV INVERTER INSTALLATION INSTRUCTIONS about How to Install An Inverter in Your RV.
Outdoor enthusiasts usually finding having reliable power in their RV is a must to make it feel like “home”, and this is usually where an inverter comes into play.
As a vital electrical device, an inverter will convert the DC battery power to AC power to keep AC household appliances running during your stay in the wild or work trips.
Installation of a power inverter charger in a RV is an easy DIY process.
In this article, we will guide you with the exact steps of installing a power inverter charger in your RV.
- Select A Location
Firstly, you need to determine an area to install your RV inverter. Ideally, the location should be away from flammable subject, heat, severe vibration, corrosive air, heavy dusts, heavy moisture and there should be sufficient ventilation of air.
For optimal performance, the inverter should be as close as possible to the battery pack to reduce voltage loss.
It is recommended that the inverter be installed in the middle of the RV compartment.
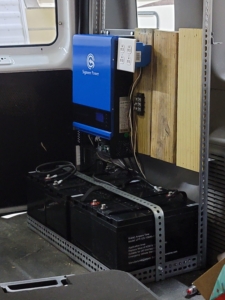
3KW Solar Inverter In a Truck
- Mounting the Inverter
Once you have chosen the perfect location for installation, mount the inverter to a surface.
It can be a floor or a wall.
When it is installed on a wall, the DC side of the inverter must be installed downward for optimal heat emission.
The holes on the inverter flange are designed for both screws and bolts.
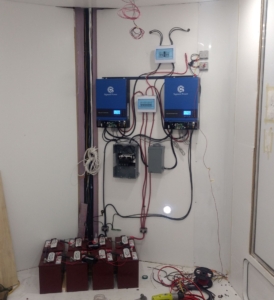
3KW Solar Inverter In Parallel Operation
- DC & AC Wiring
Lastly, complete the wiring of your RV inverter so that it can start supplying power to your existing RV outlets to power your appliances.
It is recommended that a DC fuse or breaker be installed between the battery and inverter DC terminals.
Tighten the screws on the DC terminal bolts, or overheating could occur.
Warn: The inverter has no DC polarity reverse protection, even the inverter is not powered on, reverse the polarity will permanently damage the inverter.
Then, ground your inverter to the vehicle chassis and battery negative post.
The inverter can be grounded by either the ground lug or the ground pin on the AC terminal block.
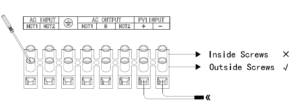
The AC terminal is designed for hard wire. The outside pin screws can be loosened to hold the cables, doesn’t loosen the inside screws.
For more details, follow the RV inverter installation instructions in the inverter manual about wire size and circuit protection.
4 Use OEM accessories
The LCD remote panel port and BTS port only accept the accessories sold by Sigineer Power.
Don’t plug in any 3rd party accessories, or the RV inverter will be damaged.
If you have any questions about this RV inverter installation instructions, contact us at info@sigineer.com for help.
Leave a Reply
Want to join the discussion?Feel free to contribute!